One quick note about composition. In my mind, there are two aspects to composition: the science, and the art. The science can be understood logically and is the portion of composition I will endeavor to elaborate on, whereas the art of composition comes naturally to some, but for most great photographers, comes with lots of practice, and plenty of error.
The Rules...I mean, The Guidelines
The Rule of Thirds
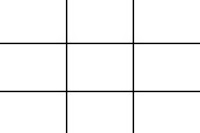
The rule of thirds is the simplest of compositional guidelines. As you're looking through your viewfinder, or at your LCD screen, picture a tic-tac-toe board overlayed across the scene you are viewing. (Some cameras will display this in the viewfinder or LCD screen. If your camera does this, I HIGHLY recommend turning it on. It's most likely referred to as "grid lines" in your cameras settings.)
As you are deciding how to compose your subject, try to line important elements up at the intersecting points of the horizontal and vertical lines. If not at the intersecting points, than along the lines is still preferred. It's preached that aligning the elements of your image according to these lines creates more tension, interest, and energy than centering your image would. Here's a real example of the rule of thirds in action:
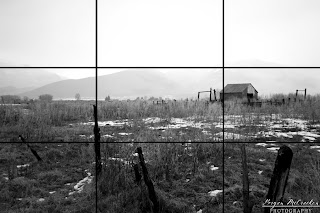
Notice the fence line in the bottom of the frame is lined up with the lower horizontal line, the shed is lined up with the vertical line on the right, and the tops of the mountains are close to the horizontal line at the top. This is also a good example of how even though there is a horizontal line running straight through the center of the image splitting the top and bottom halves, all of the other elements of the image are off-center and lined up with the grid lines. Remember, these rules are really more guidelines, than rules.
Leading Lines
Leading lines are another element of composition that pleases the eye. The idea here is that the eye of the viewer will follow certain paths and naturally lead them to certain parts of the image, giving greater emphasis to certain parts of an image. They can also be used to guide a viewer's eye through the image, not leading to an exact part of the image, but helping create the effect of fluidity and motion though the photography. The lines can be leading in any direction, and don't necessarily have to be touching the object which they are supposed to put emphasis on, nor do they have to be "lines". They can be objects lined up in a row for instance, or even curved lines. The best way I know how to describe this is with examples (you can click on each picture to see a larger version of it):

The lines on the brick lead you to the subjects face, and eyes

This one's pretty obvious how the lines lead you, and where.

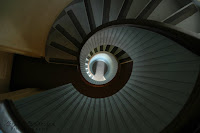
This image is an example of curved lines, and straight lines working together to lead you through the image. The floor obviously isn't a very important part of this image, but the lines help take you down through the image giving it some mobility.

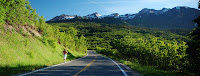
The road in this image acts as a guide to lead you to the runner, and through to create a path for the eye to follow to the mountains.
Just remember to practice in order to master these concepts. You might even want to go out shooting and assign yourself the task to focus on just one aspect at a time. I'll continue to talk about some other aspects of composition in my next post.

2 comments:
Oooh, good post! Composition is definitely something I need to work on.
I'm excited about this new blog for sure and I'm honored to ask your first request. ISO. I've read and browsed and read some more and I still don't get it. Why would you change it to your benefit and in what situations? I like the way you explained the first post with the photos as examples. It definitely helps to see an actual example along with the description.
If you ever need more questions asked, I think I can help with that.
love you bry thanks for doing this
Post a Comment