Hey Fellow Photography Nerds!

Does it drive you nuts when you have a blurry picture of your active child? Ever wonder why your subjects look jaundice? And what the heck is RAW? There is so much to know about photography in order to get the images you want, even if you're a casual shooter taking snapshots of your family and friends, and unfortunately, there's also a lack of simple, easy to understand, and most importantly, FREE resources out there. My goal with this blog is to use my experience from working in a camera store and shooting pictures (some as a hobby, some as a business) to help everyone from the "Soccer Mom" to the "Hobbyist" get the images they've always wanted. Have a question for me? Leave a comment and ask away. I'll either do a post about it, or if you'd like, I can send an email (given you leave an email address). Be sure to check out the archives to read about past topics.

If you'd like to add my button for this site to your blog or website, feel free! Here's the HTML:


Sunday, January 11, 2009

Metering Systems

Alright, now that you're all wrapping your heads around this exposure concept, one topic that relates to this that needs to be covered briefly is metering systems, or the way your camera decides how much light it is dealing with in order to set a proper exposure. The camera uses the metering system to decide on which side to put it's marker on the exposure line. Is the picture going to be overexposed, or underexposed? Without covering this topic, every once in a while, your camera will confuse you by telling you that the settings you have should get you a perfect exposure, but when you take the picture, it's still extremely over or underexposed for your liking.

Every camera comes with a built in metering system, DSLR's and point and shoots. And every camera generally has the same three modes within the metering system; Evaluative/Matrix, metering, Center-weighted metering, and Spot metering. If you dig around in your camera's menu, you should find a place to change between these modes. Some cameras even have a dial on the body of the camera to change these. Each has a symbol that describes which mode you have your camera set to:


Take a look to the left of the AE-L/AF-L button on this camera, and notice those three symbols. Those are the symbols for the different metering modes. The top is the symbol for Center-weighted metering, the middle is Evaluative, and the bottom is for Spot metering (bet you couldn't have figured that last one out by yourselves).

Evaluative or Matrix Metering: Evaluative metering mode reads the available light from several different spots in the frame (the number of these spots varies from camera to camera) and decides on an average exposure for all of these areas. It considers almost all of the frame.

Center-weighted Metering: This mode looks at only the center of the frame to see what light it's dealing with. Some cameras have the ability to change the size of this area from a larger to a smaller area.

Spot Metering: Spot metering only looks at a very small area within the image. This spot can be changed to any one area within the frame.

Let me do some visuals to illustrate. Let's say you were asked to shoot a big family picture for some friends. This was quite a difficult lighting situation. It was around 11 in the morning and the sun was high in the sky, shining bright. The sun was really too bright and too high in the sky to shoot the family out in the sunlight (they would have had "raccoon eye" shadows) so you decide to shoot them in the shade. The only problem was that there weren't any spots that were completely in the shade. The bright sun was always showing in one area or another. This picture has very bright sun in the background, and then darker shadow areas that the family was standing in, which area is quite a bit darker than the sunlit areas. So, which mode would be you set your camera to? Evaluative right? Since there was a little bit of bright and a little bit of dark? Think again.


This is how Evaluative metering would have looked at the picture (the shaded areas are what it would be looking at). It would have considered that in the background there were really bright areas, and that there were also shadow areas that were quite a bit darker, and it would have tried to settle on an average of the two. Had you followed this seemingly wise guidance, you would have shot with a faster shutter speed, thus making the sunlit areas less bright, with more detail, but sacrificing the subjects in order to do this. They would have been way too dark, and since they're the main focus, this mode would not have worked well.


Center-weighted metering still is looking at that bright background and telling you to shoot at a faster shutter speed. In this particular instance, it really wouldn't have told you much different than Evaluative metering, and the family still would have been too dark for your liking, and theirs. However, if you had been able to zoom in closer, or the bright area didn't extend so far into the frame, then Center-weighted could have potentially worked.


Spot metering wins! It's only really taking into consideration the light that's falling on the family, so you know that if you go off of what the camera is telling you now, the exposure on the family will be closer to what you want. They won't be too dark. So you slowed your shutter speed down. This made it so that the background is completely blown out, meaning, the camera didn't capture any information at all, so the bright spots are just white. You can't see any of the detail in the leaves and trees in the background. That's fine though, because you don't care about the foliage, you care about the family.

Now when your camera is telling you one thing and gives you another, double check which metering mode it's on. The camera really hasn't developed artificial intelligence and is purposefully deceiving you out of spite, it's just doing what it's told. And like any good piece of technology, the operator just has to tell it to do the right thing!

Sunday, December 7, 2008

Exposure.....not the indecent kind

Hey there everyone! Sorry for the delayed post. I know I promised some of you I would do this a lot sooner than I am, and I'd like to be able to say that I haven't posted because I've been too busy shooting new pictures, but unfortunately, that's not the case.

I've had several people ask me recently for tips on how to get the right exposure, and because it's a pretty in depth subject, I haven't been able to give them all the information they've needed in just the few minutes we have had to chat. This post is going to endeavor to explain the basics, and some advanced things, hopefully making this subject a little more clear for you. Like my composition post, this one will be broken up into different parts, so be sure to make sure you read all of them.

"Soapbox please!" Some of you may read this post thinking to yourself, "why all the fuss about exposure? Can't I just fix my exposure in Photoshop?" The answer to that question is......not always. I'll cover why later, but let me say this: Your pictures WILL look better if you get the exposure right when you first take the picture. Trust me on this. I'll get off my soapbox now.

The word "photograph" comes from the Greek words "phos", meaning "light", and "graph" meaning "to draw", so a photograph, by definition, is a drawing made from light. Exposure gets it's name because it refers to how the digital sensor, or film, is exposed to the light coming through the lens (I'll refer to digital sensors, since I shoot digital, and I think probably all people reading this shoot digital as well. If you do shoot film, why? J/K, the same principles apply to film). If the sensor doesn't record enough light for the desired result, we refer to this as underexposure, and the picture will be too dark. Conversely, if the sensor records too much light, it's called overexposure, and will be too bright. Either result is undesired. So, how do you avoid these undesirables? Well, let's get started!

I'll explain how your camera figures out exposure, but keep in mind, your camera is a computer that doesn't know what you're really trying to take a picture of, so it won't always decide on an exposure that is suitable for the particular photograph you're trying to get.

There are three things that determine your exposure. There's the shutter speed, the aperture, and the ISO. There's a thousand different combinations of these three things, each will effect your picture differently.

So, shutter speed. What's it all about? The name is maybe a little deceiving. Perhaps it should be called shutter time? In fact, the mode to change the shutter speed on some cameras is actually referred to as "Time Value" (Tv) instead of "Shutter Priority" (S). Your shutter speed is the amount of time that your shutter stays open for, exposing the sensor to light. Shutter speed is measured in seconds, and fractions of seconds. Most Digital SLR's have a shutter speed ranging from 30 seconds (displayed as 30" on your camera) to 1/4000 of a second. Obviously, the longer you leave the shutter open for, the more light is coming in, and the brighter your picture will be, and vice versa. Kind of like a sunbather; the longer he stays out in the sun, the brighter the shade of red his skin will turn. Leave the shutter open too long, you've got yourself some good ol' fashioned, PeeWee Herman, overexposure. Not long enough, and you're picture will be too dark/underexposed.

The other aspect of photography that shutter speed effects is motion. You know those pictures you're constantly getting of your kids playing around inside that always turn out blurry? It's because your shutter speed is too slow. The longer you leave your shutter open, the more motion your camera will pick up. And of course, there's the opposite end of the spectrum where the faster your shutter speed is, the more motion you will freeze. Sports photographers shoot at fast shutter speeds, landscape photographers taking those pictures of the fuzzy water shoot at slow shutter speeds. Here's a quick visual:
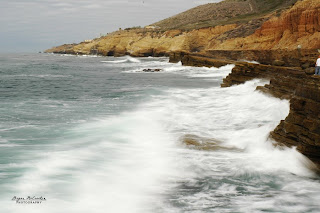
Slow Shutter Speed


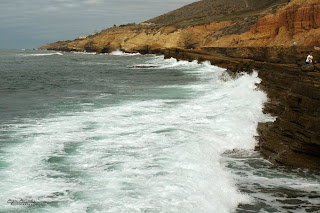
Waves moving at the same speed as above, but shot with a fast shutter speed.

Motion blur is always because of a shutter speed that is too slow, but the source of the actual motion causing the blur can be from one of two areas. Either your subject is moving too fast for your chosen shutter speed, or, your shutter speed is too slow and your camera is picking up on your hand and/or body movement. Even a movement as small as your heartbeat can cause blur (the only way to avoid this type of blur is to join the ranks of the undead and become a zombie. Easier said than done, I know, but it's always an option). To eliminate blur from a moving subject, try to keep that shutter speed above 1/125, generally speaking, and to keep your body from causing the blur, get a tripod. If that's not an option, the rule of thumb is to shoot at at least 1/60 of a second, or faster.

Since this post is about exposure and not capturing motion, I'll move on to talk about aperture quickly. Don't worry, I'll cover more about shutter speeds a little later in this post, and also posts to come.

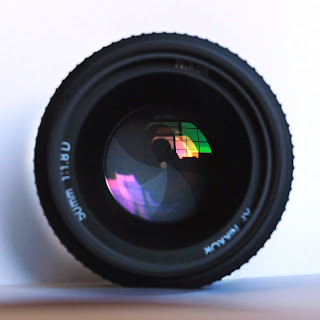
Generally, the word aperture can be used to describe any hole or opening, and in photography, that definition holds true. Your aperture is the hole in your lens through which light passes. This hole changes in diameter depending on if you want a lot of light to come in at once, or if you want to restrict the light to just a little bit at a time. The best real world example is our pupils. They dilate and constrict, constantly adjusting to light changes happening all around us. Aperture is commonly referred to as "f-stops" in the realm of photography, and is measured in numbers like f/2.8, f/5.6, f/11, and so on.

I think that aperture is probably the place where photography loses people because it's a little backwards. A small f-stop number like f/2.8 is actually a very large opening, whereas a large f-stop number like f/22 is a very small opening. Just remember, little number, big hole. Big number, little hole. Picture time!
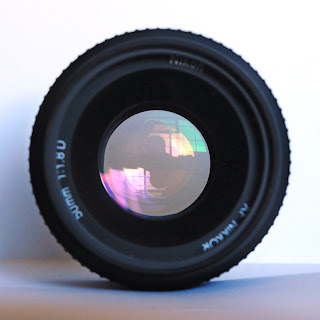


f/1.8-one of the largest apertures you can find in a lens
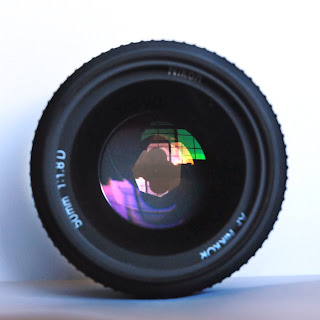
f/5.6-medim hole


f/22-small hole

Aperture also controls your Depth of Field (DOF-to be covered in a later post). For now, onto ISO!

ISO, for those geeks like me out there, stands for International Organization for Standardization. I know what you're thinking, and no, I'm not dyslexic. I know the acronym's letters don't match up, but that's really what it stands for! ISO refers to your film's or digital sensor's sensitivity to light. Your ISO is measured in numbers like 100, 200, 400, 1600, 3200 and so on and so forth. A low ISO number keeps the sensors sensitivity (redundant?) low, and boosting that number will boost the sensitivity. So, if your shooting in a low light situation, like at a wedding reception, or indoor sporting event, and your pictures are turning out way to dark, you could keep your shutter speed and aperture the same and simply increase your ISO, and the picture would turn out brighter and brighter as you continue to bump that number up.

ISO comes with one downfall though; grain! And we're not talking in terms of amber waves here people! Graininess from ISO shows up as tiny discolored speckles in your image. You'll see them in dark areas of your image first, and they can do a lot to ruin a good photograph, so be careful about your ISO levels.

Okay, enough jibber jabber, let's piece this all together. Here's a hypothetical situation. Let's say you're shooting pictures at your sons indoor basketball game. Playing a lot of basketball myself, I know that the lighting in gymnasiums may seem like plenty to our human eyes, but to a camera, that's a low light situation. You leave your camera to do the thinking, and you snap your first picture of your boy finishing off a fast break with a graceful layup. You're so proud of yourself for getting the timing just right, and you check out your camera's LCD to view your masterpiece, only to find that your boy looks like Dash from The Incredibles. Plus the picture is a little underexposed for your liking. Pickles! Your dreams of winning the blue ribbon at the County Fair have been dashed! So what do you do? Well, you know from reading your favorite photography blog, that you need to increase your shutter speed to stop the motion, so you do, and what do you get? Well, the action is frozen the way you want, but the picture is even darker? What the tarnation?! Oh yeah! Faster shutter speed, less light coming in, darker picture. Maybe you fool around with that aperture thingy and make the number smaller, and the opening bigger? You try it, snap another picture of that future All-American and.........better, but still too dark. Because you are a photographer with skills rivaling National Geographic status, you know you need to boost your ISO, so you keep your other setting the same; low aperture number, big opening, fast shutter speed, now a high ISO and YOWZA! Finally, there's the picture you want! The motion is stopped, the brightness is how you want it, there's a little bit of grain from the high ISO, but hey, better that than no picture at all, right?

I know this explanation is short, but I hope it helps. In future posts, which I'll try to have up faster than this one, I'll be going into these things more and more, so keep coming back.......please?! If you have any specific questions, you can always shoot me an email. Happy Holidays, and happy shooting!

Monday, November 10, 2008

Composition-Episode One

I know many of you are reading the title of this post thinking, "Wouldn't this be Episode Two"? Well, that's where you'd be wrong. Haven't you seen the Star Wars films?

Alright, let's keep movin! Let's talk about a couple other fringe aspects of composition to consider. Now for the brass section.....oh wait....wrong kind of composition......

Framing

Framing is when you use unimportant elements in the scene to outline, fully or partially, another, more important portion of the scene. A commonly used object to do this are trees and tree branches. By lining up the trunk of a tree on the very edge of the frame, or a branch across the top of the frame, you're helping the viewer feel like they aren't supposed to wander outside of the picture they are viewing. Heaven forbid their eyes wander onto someone else's photograph, keep them in yours! This technique is also used to draw more attention to the focal point of the picture. You'll have to excuse this example, it's not my best photograph, but when it comes to framing, I gots slim pickins. I used the toys to help eliminate the clutter around the girls face, and draw more attention to her:


Point of View/Perspective

Always consider your perspective. What are you trying to convey in your image? Are you trying to show the world through a child's eyes? Don't even think about setting the exposure before getting on your hands and knees! Going for that National Geographic shot of the world's most dangerous predatory animal? Be prepared to be a predator yourself. Perspective also has something to do with......how do I say this......not taking tourist snapshots? Documenting moments is important, but usually doesn't make for a great photograph unless it has personal meaning to someone involved. Back in the day, that's why everyone dreaded being invited over to the Smith's for cookies and a slideshow projected onto their wall of their recent road trip to the Burlingame Museum of Pez Memoribilia. If you're going for a work of art, don't just take pictures of beautiful things. Actively look around you to see what you can make beautiful with your creativity. Look up, look down at the ground, find the scene within a scene. This is a hard thing to teach verbally, so maybe some pictures will illustrate better (the picture/illustration pun was unintended, unless you ask my wife, she would tell you I just can't help it).


This picture was taken on the walkway outside of my apartment in Texas. A scene I walked by and ignored everyday, until this day.

Here's a nice picture. You could leave and be happy with it.......

....but look at the picture you could miss by walking away. The barbed wire in the fence, who woulda thunk?

Cropping

Unfortunately for most photographers, at least the ones who don't have thousands of dollars to spend on different types of cameras, we're stuck viewing the world through a rectangle. Our viewfinder limits us to how we can compose our pictures, right? Everything has to be rectangular.......thanks to digital, shooting in different aspect ratios (we'll talk about aspect ratios later) is too easy not to be taken advantage of. When you're composing a shot and it just doesn't seem to be working well, think to yourself, how would this look if it were a square image? What about a long panoramic? Even better, go out there and purposefully look for images that fit these ratios. It just takes a couple moments in whatever image editing software you have. Lo and behold, some examples:

Eh, it's okay.

What do you think? Better?

Bottom line, try to look at things you see everyday, and think, how could this make a great photograph? If you try to do this, chances are that some of the most common, everyday things will become your favorite subjects.....


Wednesday, November 5, 2008

Composition-An Introduction

Since this is my very first instructional post, I thought I'd start at the very beginning, since it's a very good place to start. Every photograph begins with the way that the photographer composes the image. To some, composition may seem insignificant, especially if they're struggling with other technical aspects of photography, like exposure, or white balance. To these, and to all, I suggest that composition is the making or breaking point of a good image. It's what elevates a snapshot to a photograph, a family album print, to a work of fine art. With this in mind, let's get started.

One quick note about composition. In my mind, there are two aspects to composition: the science, and the art. The science can be understood logically and is the portion of composition I will endeavor to elaborate on, whereas the art of composition comes naturally to some, but for most great photographers, comes with lots of practice, and plenty of error.

The Rules...I mean, The Guidelines

The Rule of Thirds


The rule of thirds is the simplest of compositional guidelines. As you're looking through your viewfinder, or at your LCD screen, picture a tic-tac-toe board overlayed across the scene you are viewing. (Some cameras will display this in the viewfinder or LCD screen. If your camera does this, I HIGHLY recommend turning it on. It's most likely referred to as "grid lines" in your cameras settings.)


As you are deciding how to compose your subject, try to line important elements up at the intersecting points of the horizontal and vertical lines. If not at the intersecting points, than along the lines is still preferred. It's preached that aligning the elements of your image according to these lines creates more tension, interest, and energy than centering your image would. Here's a real example of the rule of thirds in action:


Notice the fence line in the bottom of the frame is lined up with the lower horizontal line, the shed is lined up with the vertical line on the right, and the tops of the mountains are close to the horizontal line at the top. This is also a good example of how even though there is a horizontal line running straight through the center of the image splitting the top and bottom halves, all of the other elements of the image are off-center and lined up with the grid lines. Remember, these rules are really more guidelines, than rules.

Leading Lines

Leading lines are another element of composition that pleases the eye. The idea here is that the eye of the viewer will follow certain paths and naturally lead them to certain parts of the image, giving greater emphasis to certain parts of an image. They can also be used to guide a viewer's eye through the image, not leading to an exact part of the image, but helping create the effect of fluidity and motion though the photography. The lines can be leading in any direction, and don't necessarily have to be touching the object which they are supposed to put emphasis on, nor do they have to be "lines". They can be objects lined up in a row for instance, or even curved lines. The best way I know how to describe this is with examples (you can click on each picture to see a larger version of it):


The lines on the brick lead you to the subjects face, and eyes


This one's pretty obvious how the lines lead you, and where.


This image is an example of curved lines, and straight lines working together to lead you through the image. The floor obviously isn't a very important part of this image, but the lines help take you down through the image giving it some mobility.


The road in this image acts as a guide to lead you to the runner, and through to create a path for the eye to follow to the mountains.

Just remember to practice in order to master these concepts. You might even want to go out shooting and assign yourself the task to focus on just one aspect at a time. I'll continue to talk about some other aspects of composition in my next post.

Sunday, November 2, 2008

Be Patient

If you're visiting this site and there's nothing here but this post, thanks, and please check back shortly. This blog was created late at night, and I was too tired to do my first real post once I got the layout setup the way I wanted. Come back soon!